Fifth theory- Greenland Method
For this method it is best to start with the following measurements:
Notes on # 5 and 6: This pattern gives you four pieces across the front and back of the garment, instead of two like all the others making it necessary to determine the halfway point. That is what this does. Arrange your mockup fabric (60" wide works best) so that the selvages meet over the center of the cloth. Mark the length (#4) plus a few inches on the cloth. At one end, apply measurement #5 from the selvages on both sides of the selvages. At the other end of the length, from the outside folds, apply measurement 6 into the cloth on both sides. Connect these two points. (See Diagram!) Cut along the lines, all folds and the line under the two selvages. If your measurements 5 and 6 were different, label the relevant pieces 'front' and 'back'. Assemble the garment with the selvages to the center front. Attach the straight edge of the next front piece to the bias edge of the first front piece. The back should be assembled in a similar way, except the center back should be on the bias. This will make all the seams around the body bias to straight. This will help to prevent the bias from stretching out of shape and will make the garment flow better. It also makes it easier to disguise piecing a pattern when using brocade. Leave the front un-sewn, and keep the side seams open at the top 9 inches or so and at center back about 1-2 inches. Baste the shoulder seams closed and try on the garment. Carefully cut away the excess fabric at the neck, remembering to leave a seam allowance. Next, determine if the seams going over the shoulder are in the middle of the shoulder (Dividing the distance between the neck and the shoulder point in half). If they are not, then pin the excess up and in, until the seam is centered. Taper this line down into the garment about 4-6 inches. Then carefully cut away to make the armhole, also remembering to leave a seam allowance. Comments on this method: Gives less fullness than other methods, though it could be tried with the addition of gores in the seams. Gives a neckline seam, as well as a bit of the drape from the circular forms since the shoulder seam is angled. Can be used for narrow cloths, as well as those with a pattern or nap (though care must be taken so that the naps are running the same way over the fronts and backs of the garment), since the wedges of cloth are narrow. |
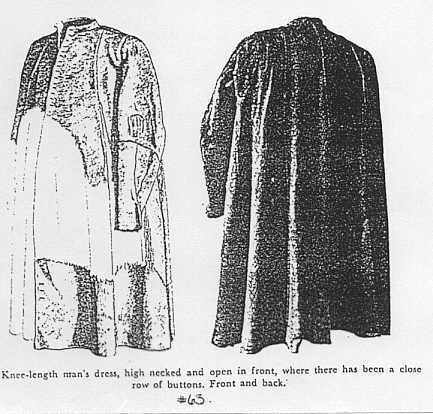 This
method is based on Garment number 63 of the Herjolfesnes finds in Greenland.
(Pictures of the pattern are found on Marc Carlson's page, and Poul Norlunds
book, both cited in the bibliography) It is almost certainly a man's garment
from the length and proportion. However, it offers interesting insights
into the patterning process for narrow cloths. It is made with a number
of almost wedge shaped pieces, none of which are wider than 24 inches.
When made up in its original proportions it makes an attractive, if not
hugely full, houpelande. I suspect that this cutting method was used to
achieve the shape of the fashionable garment while making use of the available
cloth, probably made on a warp weighted loom, and of narrow (20-25") width.
It may also have been used on the continent when using narrow brocades
or patterned cloths.
This
method is based on Garment number 63 of the Herjolfesnes finds in Greenland.
(Pictures of the pattern are found on Marc Carlson's page, and Poul Norlunds
book, both cited in the bibliography) It is almost certainly a man's garment
from the length and proportion. However, it offers interesting insights
into the patterning process for narrow cloths. It is made with a number
of almost wedge shaped pieces, none of which are wider than 24 inches.
When made up in its original proportions it makes an attractive, if not
hugely full, houpelande. I suspect that this cutting method was used to
achieve the shape of the fashionable garment while making use of the available
cloth, probably made on a warp weighted loom, and of narrow (20-25") width.
It may also have been used on the continent when using narrow brocades
or patterned cloths.