Section # 3 Card WeavingCard weaving (sometimes called 'Tablet weaving') is a very old technique
used primarily for making fairly narrow woven bands. A pack of cards/
tablets made of wood, antler or hide was used as a shedding device: by
rotating the cards forward or backwards openings are created in the warp
for the weft to pass through, allowing the weaving to progress efficiently.
Each tablet was usually about 25-40 mm, (1"-1.75") square and pierced
with four holes. The warp was threaded through the holes and tensioned
either by running it from a fixed point and tying it to the weaver's waist,
or by stretching it between two posts. Bands thus created could serve
many purposes, used 'as is' for belts or trim, or used as a beginning
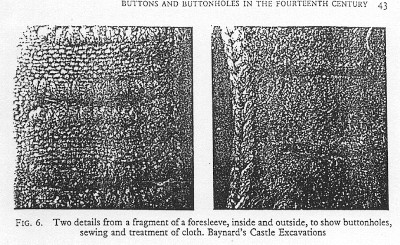
for warp weighted loom work. In the fourteenth century, an additional use was found for this old
technique: as a reinforcement to a buttoned garment edge. Instead of being
a trim that was woven and then applied to the edge, it was woven directly
on to the edge of the buttonhole side of a garment. This was originally
interpreted as a decorative chain stitch (Nevinson), but further research
has revealed its true nature. It is a cunning and subtle way of reinforcing
the edge which would come under considerable strain when the very fitted
garment was closed.
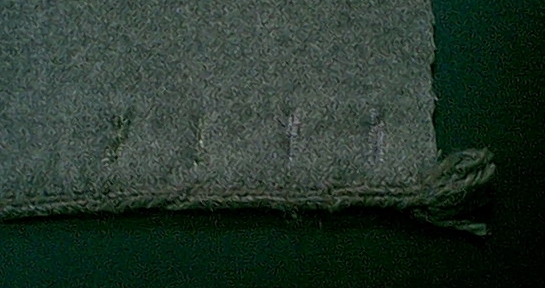
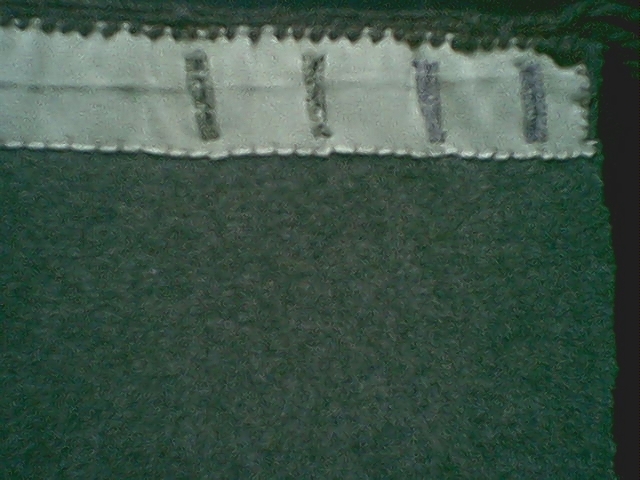
In general, use only a few cards, otherwise the trim becomes too wide and can curl over. I used only two cards, and found that to be quite enough. Use thin wool or silk yarns, or your trim will get bulky very quickly! When colour on the finds can be determined, the card weaving seems to be similar to that of the garment fabric. If you use a very different colour, the weaving will be more noticeable; this could be a good or a bad thing. You could try an elaborate pattern in your cards (if you are using very thin yarns) but this trim is ideally quite narrow so very few people will notice. If you thread the cards in pairs with the yarns coming out in between each pair of cards, you will achieve an attractive 'braided' pattern. The specific method I used is as follows. I found a tray that I could attach some C-clamps to without damage. This gives you something to balance your fabric piece on while you are card weaving, and the clamps provide a place to tie your warp ends under tension. I purchased some yarn of an appropriate colour and fiber content. Wool and silk have both been found in the London digs. Some of the finds have missing facings, but have holes suggesting that there was both a facing and card weaving there originally. This suggests to the writers of T+C that the facings and weaving were made of linen, which decomposes quite quickly. Do pre wash your yarn so that any initial shrinkage happens before you weave it to the garment. I then cut some warps (eight) about twice as long as my edge, tied them together, and attached them to the far clamp. I threaded the 2 cards so that all the yarns came out in between the two cards, and tied off the remainder of the yarn and tied it under tension to the closer clamp. I threaded a sharp pointed, large eye needle with yarn (about a meter long), to act as my shuttle. Please note, I am left handed and all of these instructions are from my perspective. If you are not a 'lefty', make the suitable reversals.
1) Put the needle through the gap in the warps created by the cards and pull it taut, so the garment edge is next to the warps. 2) Turn the cards to create a new gap and put the needle through the warps again (but from the other direction), pulling it taut 3) Insert the needle through the facing and fabric from top to bottom and pull it taut 4) Repeat until finished I found that the effect of turning the cards in only one direction gave me a result most similar to the samples found. This creates a massive tangle as the warps twist onto themselves, so on my first attempts, I compromised and changed the direction of the cards every four inches or so. However, I have since discovered that since there are only 8 warp threads, it is not very difficult to take the tension off the weaving and untangle the yarn before tying it back up again and continuing. When the end of the facing is reached, bring the needle through the fabric top to bottom and then bottom to top (making a small stitch) then tie off or knot the thread. Cut the warps away from the clamps, leaving thread tails of at least 25 mm. Insert the needle into the end of the card weaving (go in at least 25 mm), thread the needle with a warp thread and pull it through. Repeat until all the warp tails are inside the weaving, and the ends look clean and neat. |